pin it button

Tuesday, February 28, 2012

March Play Group Projects (with the Close To My Heart "Lucy" Kit)

March Play Group classes are just around the corner. I'd LOVE to have you come to one of them, host one in your home with your friends, or even participate long distance. I'm confident you would enjoy what we do and be happy with the projects you make!  Keep reading...

I need to hear from you no later than this Friday, March 2 if you want to participate.  We will be making three 2-page 12" x 12" layouts using the "Lucy" kit that are so soft and pretty. I imagine little girl birthday photos, tea party photos, anything girly, or even Easter! You'll recognize these papers because I shared art projects all week last week made with them.  If you didn't catch them then, be sure to scroll back through. 

Here are the layouts (click on any photo to see it larger and in more detail). I've shared the details of the class, the kits, and how to participate after the photos. If you are not familiar with my Play Group classes, scroll down the left side of my blog until you find the section called "Play Group Information" and read away!  Enjoy!

Layout #1 (and detail photos below): "You'll always be my baby"


----------------------
Layout #2 (and detail photos below): "Love this smile"

 --------------------------

Layout #3 (and detail photos below): "Sassy and beautiful"


 --------------------------

Class Dates and Times to choose from:
Thursday, March 15, 10 am - 1 pm (this class is in American Fork, UT)
Thursday, March 15, 7-10 pm (this class is in Pleasant Grove, UT)
Friday, March 16, 7-10 pm (this class is in American Fork, UT)

You can also host this workshop in your home (in Utah) with your friends during the month of February and earn FREE hostess rewards (free CTMH shopping spree!) while you do it. If you are interested in doing that, please contact me (801.360,9896, pedermom@aol.com) and I'll give you all the details.

You can also participate in this workshop long-distance. If you choose to do so, just add $5 to the cost of whichever kit you choose for the extra shipping.  I suggest if you are participating long-distance that you at least order the "Better Kit", and any stamp pads we are using that you don't already have.  If you participate long distance, I am happy to stamp the items using stamp sets that aren't in the kit for you since you probably won't have the stamp pads and alphabet stamp (unless you order the "Best Kit"). That is my little gift to you if you participate long-distance.

Remember, in order to attend, you only need to purchase the Basic Kit. Anything above and beyond that is totally up to you. This month, I suggest you consider the Better Kit. The few items I've added there make a huge difference to your pages. If you already have any of the items in the Better or Best kits, just bring them with you to class.

Lucy Play Group Shopping List (for your convenience, I have linked each product to it's page on my website so you can see them). You are only required to purchase the "Basic Kit" to participate. Anything above and beyond that is totally up to you. I personally recommend the "Better Kit".

Basic Kit:
  • Lucy Workshop on the Go Kit which includes: Stamp Set, Lucy Level 2 Paper Pack, Lucy Complements Glittery Rubons, Bitty Sparkles, Instructional Brochure)
  • 3 Extra Sheets of Colonial White Cardstock
  • Karen's Cutting Guide
Subtotal: $32.95
Total (including shipping and tax): $37.80

Better Kit = Basic Kit + the following products:
Subtotal: $51.30*
Total (including shipping and tax): $58.85

Best Kit = Basic Kit + Better Kit + the following products:
Subtotal: $86.25*
Total (including shipping and tax): $98.94

*at this purchase level you qualify for the March Stamp of the Month ($17.95 value) for only $5!
March Stamp of the Month

Call or email me with your order and to reserve your spot at a Play Group class (801.360.9896, pedermom@aol.com) by this Friday, March 2.

Also, don't forget about the February Specials. They end tomorrow!

To close, I thought I'd share a photo of where I'll be this coming week! I'm thrilled to have earned my 9th trip with Close To My Heart. This one is a 7-day Hawaiian Island cruise. Even though it would have been wonderful to take Dan-the-Man (he and I did this cruise together about 13 years ago), after much discussion we decided it would be an awesome idea for me to take Dawson instead. He is the only member of the family who has never been to Hawaii. So, we surprised him with it on Christmas.  SO MUCH FUN! I love working with a company that is so generous with their consultants. Because of their generosity, I have taken my hubby on several cruises, my whole family on one together, and each family member on at least one one-on-one trip with me.  These memories and experiences will be cherished by my family and me forever!


Friday, February 24, 2012

Over $450 for $99!


When I received notice this week of the special that Close To My Heart is running for March, my mouth dropped open so wide it hit the floor.  When that happened all the drool that had been accumulating spilled out, but I didn't even notice because I was trying to hard to get my mouth shut. When I finally did, I started to walk across the floor and slipped in the big puddle of drool, hit my head, split it open and it bled like crazy. After that happened, Dan-the-Man rushed me to the hospital for stitches. Good thing I waited until they had finished stitching me up before I told everyone in the emergency room about this special, because then all of them were slipping in their drool and getting stitches. It was a crazy sight...dozens of hospital workers all stitching each other up and trying to stop drooling in the process.

Okay, okay...of course I'm kidding.  But, I did want to set up this AMAZING special so you could begin by knowing what an AMAZING (oh yeah, I already used that word. But that's what it is....AMAZING) deal it is. 

Drum roll please....

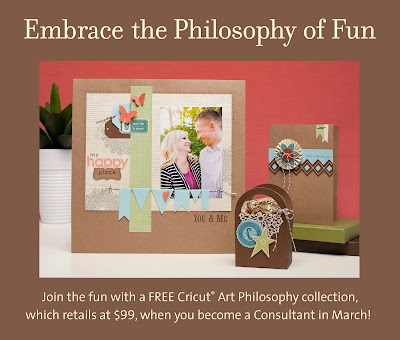
If you sign up to be a Close To My Heart Consultant in March, you get the $99 Art Philosophy Close To My Heart/Cricut Collection FREE (Check out the photo at the top of this post. All of these projects were created with the collection. Yum.)!  No kidding.
This collection includes:
  • 1-Cartridge (over 700 images: font, shapes and 3-D items. A cartridge this quality would normally retail for about $60)
  • 3 - My Acrylix D-size Stamp Sets (all of which coordinate with the shapes on the cartrdige!  This is about a $55 value.)
  • 3 - 9" x 12" Dimensional Elements (3 sheets of different shapes that all coordinate with the shapes on the cartridge!  This is over a $15 value.)
No kidding!  That's over $130 in value for only a $99 retail price, and even BETTER, it can be yours in March FREE when you sign up to be a CTMH Consultant like me.  FYI: If you already have the Art Philosophy Collection, no worries. You'll get $100 in product credit instead!  This just keeps getting better and better.

"So," you're asking, "How do I do that?"

Easy, Peasy, Lemon Squeasy:
  1. Go to my website at www.ctmh.com/leavealegacy and click on "Your Opportunities" and go from there.
  2. You will need to purchase the basic "New Consultant" kit for $99 (which is about a $300 value).  The website will walk you through this step-by-step
  3. After you sign up, I'll contact you and help you get going.
Here is a photo of what is included in the New Consultant Kit:


There are also some add-on kits you can choose to purchase to help you get started if you wish, but they are not required.  Yep, that's the truth. For only $99 you can become a Close To My Heart Consultant in March and get over $450 in product back. WOWZA! It makes  me want to sign up all over again.

Have I mentioned lately how much I LOVE what I do? I have been a CTMH Consultant for over 19 years.  I have loved every minute of it. When I signed up, I had no idea that it would turn into what it has for me and my family.  I am a large contributor to our family's income, and I do it with a schedule that works around my family.  I'd love to tell you more about it and answer any questions you might have.  Feel free to contact me (801.360.9896, pedermom@aol.com).


Have a great day!  I hope to see you join my team in March!


Wednesday, February 22, 2012

Heartfelt Wishes Card (6" x 6")

This is it...the last of the "Lucy" display I made several of my team members (to see the rest, scroll back through the last 4 or 5 posts). This 6" x 6" card could be used for almost anything with the "heartfelt WISHES" sentiment I chose to use. It would be great for a birthday, Mother's Day, a sympathy card, or even just a plain, old "just because" card.

Although this is the last of the "Lucy" display, it is not the end of what you'll be seeing with Lucy in the next few days.  We will also be making three 2-page 12" x 12 layouts with the Lucy kit in my Play Group classes in March. I'll be showing those and announcing class and kit information in a couple of days. Stay tuned...

In the meantime, here are the wonderful Close To My Heart products I used to create this card:  Lucy Level 2 Paper Pack, Lucy Workshop on the Go Stamp Set (if you attend one of my March Play Group classes you will get this kit!), Sympathy Card Chatter Stamp Set, Grey Wool Stamp Pad, Blush Stamp Pad, Creme Brulee Stamp Pad, Liquid Glass, Prisma Glitter, Natural Baker's Twine Collection, 3D Foam Tape.

You can order these and many other wonderful products on my website, 24/7.  Be sure to check out the Close To My Heart February specials here before ordering. Also, I just wanted to remind you of the beautiful February Stamp of the Month, which is yours for only $5 with a $50 order (before shipping and tax).  Isn't this a set that almost anyone would use a lot? I think so!

Have a great day!  I plan to!

Monday, February 20, 2012

Thinking of You Card Made with the Close To My Heart "Lucy" Paper Pack and a Recipe (Chicken Parmesan Bake)

Back again today with another of my "Lucy" creations.  Are you sick of them yet? I hope not because I have one more to share after today.  I hope my $2000 sellers in one month team members are enjoying the displays I created for them.

I intentionally made this 5" x 7" card feel different from the rest of the items in the display. I wanted it to be an example of how different something made with the same colors and stamps can look when you change up your style and featured color a little bit.

I stamped the Creme Brulee paper with the large flower outline stamp from the Lucy Workshop on the Go stamp set with Creme Brulee ink (tone-on-tone stamping) to create the background. The focal point is the same flower with outline stamped in Grey Wool and the solid inner stamp done in Creme Brulee.  then shaded a bit on top of the stamping with my Watercolor Pencils and then blended just a tad with my Waterbrush.  I filled the center of the flower with our beautiful (and so often used by me!) Licorice OpaquesThe sentiment is also stamped in Grey Wool ink. Voila! Simple and pretty, at least I hope that's the effect.


Close To My Heart products used:  Lucy Workshop on the Go Stamp Set, Card Chatter Sympathy Stamp Set, Lucy Level 2 Paper Pack, Creme Brulee Stamp Pad, Grey Wool Stamp Pad, Watercolor Pencils, Waterbrush, Licorice Opaques, 3D Foam Tape (to pop the focal point square up off the card a bit).

You can shop for these and so many other wonderful products on my website 24/7.  Be sure to check out the February Close To My Heart specials here before you do!

I also wanted to share a yummy recipe with you all. I found this recipe on Pinterest a couple of months ago and tried it with my family. They loved it!  I have made it a couple of times since then. This past week, I had the basketball team lunch at my house. Dawson requested that I make this (of course, as you probably already know, Dawson has Celiac Disease so I also made a gluten free version...I'll make notes in the recipe for those of you who need your recipe gluten-free) for the team.  I served it with garlic bread and Salad de Maison, with Scotcheroos for dessert. The boys loved it.  Yay!


Chicken Parmesan Bake (the end of Chicken Parmesan as you know it!)

Ingredients:
2 tbsp olive oil
2 cloves garlic, crushed
hot red pepper flakes, to taste
6 boneless skinless chicken breasts
2 cups marinara sauce (for gluten free, use Prego Traditional sauce...actually I use this for both. I love this sauce!)
1/4 cup chopped basil
8 oz mozzarella, shredded
4 oz Parmesan, grated
1 (5-oz) package garlic croutons (I found some gluten free croutons at my local health food store)

Instructions:
In a 9" x 13" casserole dish combine olive oil, garlic and hot red pepper flakes and spread to cover whole bottom of dish.  Lay washed and trimmed chicken breasts on top of this.  Spread sauce on top.  Next sprinkle your chopped basil on top of the sauce.  Next layer is cheese (both kinds) evenly distributed on sauce (save a little cheese for final layer). Croutons go on top of this then the rest of the cheese. Bake at 350 degrees uncovered for 35-40 minutes (until chicken is done).  

Enjoy! 


Friday, February 17, 2012

Thank You Card Made with Close To My Heart's Lucy Paper Pack

Here I am...back with another card that is part of the"Lucy" (love this girlie, soft, feminine kit!) display I am making for the hard-working members of my team who had a $2000 sales month (click here for an explanation).  This card was inspired by the sketch this week at the Mojo Monday blog. I really love their sketches and wish I had a little more time to play with them each week. I'm always happy when I find a few minutes.

As you can see, I turned the card direction, but kept the rest almost exactly to the sketch. 

Close To My Heart products used and quick explanations of techniques:  Lucy Level 2 Paper Pack, Lucy Workshop on the Go Stamp Set, Card Chatter Sympathy Stamp Set, Cricut/CTMH Art Philosphy Cartridge (to cut bracketed shape, circles and flower shape...I love how so many of our stamps sets coordinate with the cartridge!), Grey Wool Stamp Pad, Blush Stamp Pad, Creme Brulee Stamp Pad, Liquid Glass (applied to flower to hold glitter), Prisma Glitter (to make that flower sparkly. What girl doesn't love bling?), Paradise Assortment Baker's Twine, Licorice Opaques (I find myself using our opaques on almost everything I made lately!), 3D Foam Tape.


You can buy any/all of these products, as well as so many more scrumptious goodies on my website 24/7.  Before you shop, be sure to check out the February Specials here so you don't miss out on anything!


Wednesday, February 15, 2012

Valentine Treat: A Bouquet of Strawberry Creme Suckers


My cutie pie son, Dawson asked me last week what he should do for his 'friend' for Valentine's Day. They  have been dating a little while, but not too long and he wanted to do something simple and not too over-the-top. I suggested making Valentine suckers and putting them in a little pot.  He liked the idea of making something himself, so that's what we did.


Heart Shaped Strawberry Creme Suckers in a Pot

Supplies Needed:
  • ceramic flower pot
  • some kind of stuff to put inside to hold the sucker sticks in place (we used the green stuff that makes such a mess when you cut it apart, but is nice because you can cut it to any size you want)
  • sucker/cookie-on-a-stick pan (the one I have is made by Wilton and I bought it several years ago. Maybe you can find it on their website)
  • non-stick cooking spray
  • Creme Saver candy (10 pieces per sucker).  I like these best although you could use almost any hard candy. The swirls in these candies make such fun suckers though.
  • long sucker sticks
  • candy bags (to cover suckers)
  • ribbon (to tie on candy bag)
We got the pot at Hobby Lobby (which was 50% off, so only $3. Score!). We got the candy at candydirect.com (we couldn't find Creme Savers anywhere in the stores in our town, so we ordered).

Directions:
1.  Preheat oven to 350 degrees
2.  Spray cookie/sucker pan with non-stick cooking spray
3.  Unwrap and arrange 10 candies in each heart shaped sucker spot on the pan
4.  Bake for approximately 11 minutes (until all candies are melted)
5.  Remove from oven and immediately add sticks. You want your stick to go pretty high up into the sucker for stability. Place your stick and then gently roll until it is covered in candy.  Do this to all suckers on the pan.
6.  Place pan in fridge for about 5-8 minutes
7.  Remove from fridge and carefully lift out of pan
8.  With a dry paper towel, wipe of any remaining cooking spray from sucker
9.  Put sucker in candy bag and tie with a ribbon
10.  Arrange in pot if desired

Have fun making suckers! These are great for Valentine's Day, birthdays, to tell someone you love them, to take to a friend in the hospital, and so much more. I used to make them all the time but haven't in a few years.  I'm glad Dawson helped me remember this fun project and that he and I could spend some time making them together.

Monday, February 13, 2012

Feminine 2-Page Layout: Close To My Heart's "Lucy" Kit

Happy day before Valentine's Day! I hope you have big plans with your sweetie tomorrow. We did our big date this past weekend since Dawson has a basketball game tomorrow night and also due to the fact that I am feeding the basketball team tomorrow. Should be fun!

By the way, we went to see "The Vow" and "Man on a Ledge" this weekend and I loved them both.  Yes, we are movie lovers and a mini-movie marathon was our idea of a fun Valentine date. Yes, we are boring.  I'm okay with that. ;0)

Today I thought I'd share another project that I have created to go with the "Lucy" display I am making for several members of my team.  You can read about that in my last post.  Don't worry...their layouts don't have my photos on them.   The one you are seeing here is the one I created for myself.  It features photos we took the day before I left Chicago of my beautiful mom, my beautiful daughter, my beautiful granddaughter, and me.  Here are a few close ups. Also, check out the supply list below for a few explanations on how I used some products.


layout close-up #1

layout close-up #2
CTMH products used:  Lucy Level 2 Paper Pack, Lucy WOTG Stamp Set, Hodge Podge Alphabet Stamp Set, Grey Wool Stamp Pad, Blush Stamp Pad (not only did I use this to stamp the flowers, but I also used it to sponge color on the dimensional element letters), Creme Brulee Stamp Pad, Sparkle Flourishes, Clear Sparkles, Liquid Glass (applied on the flowers as adhesive for the glitter), Prisma Glitter (on flowers, adhered with liquid glass), Dimensional Elements Monograms (G, I, R, L and S), Create-a-Shade Pearl Paint (I painted the dimensional element letters lightly with this after I sponged them with the Blush pad), CTMH/Cricut Art Philosphy Cartridge (for big scalloped circle and for the flowers), 3D Foam Tape.

You can order these, and so many other wonderful products on my website 24/7. YIPEEE! Be sure to check out the February Specials before you order so you can take advantage of those too.

I LOVE Mondays because it is the day that we receive our weekly email from our missionary son, Tannon who is serving in Granada, Spain currently.  Along with today's email came a couple of photos. I love seeing how happy Tannon looks while spending these two years (only 7 more months!) serving the Lord in Spain.


Tannon with his current companion, who is from Bolivia
Tannon at a leadership meeting dinner. It seems his manners and his appetite have not changed a bit!
I also wanted to share a couple of very cool photos of Dawson playing basketball this year.  We have a guy here in town that does amazing sports photography and he comes to the games and takes tons of photos. YAY, Mark Spencer! We mothers love you!
Dawson takes it to the hole

"I believe I can fly"
Well, that's it for today, folks. Have a wonderful Valentine's Day tomorrow.  Make sure to tell the people you love the most how much they mean to you!

Saturday, February 11, 2012

All Occassion Card: "Happy Thoughts"


 I am working on a big project this week.  Each year in May and November I offer a challenge to my Close To My Heart team. Anyone who sells $2000 or more that month gets a complete display board from me featuring one of the new kits in the Idea Book (November's challenge is filled in February when the Spring/Summer book goes live, and the May challenge is filled in August when the Autumn/Winter book goes live). It's a lot of work on my part, but so much fun to think of each team member who accomplished the challenge as I make each work of art.  I love my job! Come join my team so you can earn one! This time I chose the "Lucy" kit.  I will be featuring the colors and papers of this kit in each design for the display.


Lucy Level 2 Paper Pack
I love the soft, feminine feel of this paper packet. I hope to do it justice and make projects that my team members will be happy with. I'm also excited that my Play Group classes will be making three two-page 12" x 12" layouts with this kit in March.  If you are interested in participating (in person or long distance) just contact me for more information (801.360.9896, pedermom@aol.com).  Also, if you are interested in information about becoming a Close To My Heart Consultant and joining my team (and earning your own display!), just contact me, or head to my website here and sign up. It's easy, peasy, lemon squeasy!

Here are some more projects made using the "Lucy" kit and colors made by the talented CTMH Art Department:
Artwork by the Close To My Heart Art Department using the "Lucy" papers and colors
Yesterday I finished my first project for the display.  The card (4 1/4" x 5 1/2") you see at the top of this post was inspired by a card I saw on Pinterest by Lisa Carroll (below). I loved the simple beauty of her card and just kind of put my own take on her gorgeous design.

Close To My Heart products used on my card (top of post):  Lucy Level 2 Paper Pack, Workshop in the Go stamp set, Sympathy Card Chatter Stamp Set, Universal Backgrounds Stamp Set, Circle Around Stamp Set (retired), Blush Stamp Pad, Black Stamp Pad, Creme Brulee Stamp Pad, Grey Flannel Stamp Pad, Grey Wool Stamp Pad, Prisma Glitter, 3D Foam Tape.


Thursday, February 9, 2012

Thank You Card: February CTMH Stamp of the Month

My friend and fellow Close To My Heart Consultant, Taralyn Frost is a beautiful artist.  I did a very small favor for her, and in return she did a BIG one for me. She make me a card with each of the Stamps of the Month in the brand new Spring/Summer Close To My Heart Idea Book.  WOWZA!  That's six beautiful cards (I'll do Taralyn a favor ANY time! lol). So, each month from now through July, along with my own artwork, you will get to see a card from Taralyn right here on my blog featuring that month's Stamp of the Month. Thank you, Taralyn!


February 2012 Stamp of the Month

Don't you just love the fun colors and the linear design of this card? I sure do. I also love that the bow adds just a touch of 'soft' to go with the strong lines. Taralyn used the brand new "Stella" paper pack on this card. The "Stella" paper pack is already a huge favorite among Close To My Heart consultants and customers alike.  Here is some more gorgeous "Stella" artwork made by the uber-talented CTMH Art Studio.  Yum!


The new Spring/Summer Idea Book cover also features a gorgeous layout made with the "Stella" papers.  LOVE IT!   Click here to peruse the new Idea Book page-by-delicious page.  Then, when you've made your shopping list, just head here to my website to order.  Easy, peasy, lemon squeasy!
Spring/Summer 2012 Close To My Heart Idea Book

Here's a little peek at this gorgeous paper pack:
Stella Paper Pack
Be sure to click here to see the other wonderful February specials to take advantage of when ordering.

Here's are the CTMH products that Taralyn used to create this masterpiece:  February Stamp of the Month, Stella Level 2 Paper Pack, Cocoa Designer Ribbon, Cocoa Stamp Pad, Sunset Stamp Pad, Bronze Glitz Glitter Gel (for the 'faux brads' on the "We can't thank you enough" sentiment square), 3D foam tape.


LinkWithin

Related Posts with Thumbnails