pin it button

Thursday, March 31, 2011

One More Bird Card


This is my 2nd post for today, so be sure to scroll down for the first post with 2 other cards that matchy-matchy this one (and supply lists), and information on how to win some blog candy. Off to make some dinner....

The Gift That Keeps On Giving, Workshop on the Go Stamp Sets

Be sure to check out yesterday's blog post for some blog candy! You have until 7 pm on Friday, August 1 to qualify.

Today I thought I'd share a couple of cards (first card shown is 6" x 6" and the second is 4 1/4" x 5 1/2") I made this week using the stamp sets from two of Close To My Heart's awesome Workshop on the Go kits. The bird stamp is from the Sophia Workshop on the Go and the damask background and sentiment are from the Wings Workshop on the Go. Some of you may mistakenly think that when you order the Workshop on the Go's, you use them and then you're done. Not so! The stamp set that comes with the Workshops on the Go is a gift that keeps on giving! In fact, I also used the cool spray pen that came in the Wings Workshop on the Go on these cards. Click on either card to see them larger and in more detail.

So, what are you waiting for? Go get one of your Workshop on the Go stamp sets out and create something new!

CTMH Products used on these cards: Wings Workshop on the Go Stamp Set, Spray Pen and Left-Over Paper, Sophia Workshop on the Go Stamp Set, Desert Sand Cardstock, Black Stamp Pad, Desert Sand Re-inker, Basic Buttons Assortment, Licorice Opaques, Heart Dimensional Elements, Big Pinks (currently on sale for 33% off!), Chocolate Waxy Flax, Round Sponge, Kraft Color Ready Borders, 2" Scallop Circle Punch, Water - to mix with re-inker in the spray pen (available from your own tap...lol).

To order these or other wonderful CTMH products, shop on my website...24/7! And, don't forget to order the $5 "Hope for Japan" stamp set while you're ordering (available now through April 30). 100% of profits go to the American Red Cross efforts in Japan. Oh, one last reminder, today is the last day to get the March Stamp of the Month too!

Wednesday, March 30, 2011

3D Stamped Flower Video with Close To My Heart & BLOG CANDY!

I have a GREAT little video tutorial (less than 4 minutes long!) to share with you today on how to make stamped 3D flowers with a really fun Close To My Heart stamp set called "Spring Up" (B1365). Keep reading until the end of this post to find out about the blog candy I'm offering today.

Just as a little reminder, I do have a music play list on my blog. Because I have been posting video tutorials quite often lately I have considered taking the music off but, after emailing several of my regular readers the consensus seems to be that you like my play list and don't want it removed. I'm glad you enjoy the music I love so much! So here is how to watch this video without having to listen to it and the play list at the same time:
  1. Scroll to the very bottom of my blog until you see the play list
  2. Click on the pause button. It's in the top left corner area and looks kind of like this: II
  3. Scroll back up to the video and push the play button (arrow).
  4. Enjoy the video!
  5. When you're done, if you want the play list back on, just scroll back down and click the play arrow on that.


BLOG CANDY ANNOUNCEMENT: Comment on this post and tell me something cool you learned or noticed in the video. Deadline: you must comment no later than Friday, April 1 at 7 pm MST. I will draw a name from those comments and the winner will receive this stamp set sent to their home, FREE from me as your prize! I will announce the winner on Friday night at 8 pm my time. Be watching!

Here's a little photo of the stamp set and finished card you see on the video. You can click on the photo to see it larger and in more detail. If you are the winner of the stamp set (see "BLOG CANDY ANNOUNCEMENT" above) you can just come back to this post and copy this darling card! Stamp-lifting rocks, baby!


Close To My Heart products used in this video: Spring Up Stamp Set, Colonial White Cardstock, Blush Stamp Pad, Micro-tip Scissors, Memory Glue Dots.


To order these, or any other wonderful CTMH products, just click here and then 'shop online' and go to town....24/7!

Monday, March 28, 2011

DELICIOUS Lemon Poppy Seed Muffin Recipe


Last week I had a meeting with a few friends for a committee we serve on together. We met at my friend, Gabe's house and she had the MOST delish lemon poppy seed muffins I've ever tasted. I mean really, they were melt-in-your-mouth heaven.

After our meeting I went home and all I could do was think of those yummy muffins. So, I asked Gabe for the recipe. Lucky for me, she emailed it to me that evening and the next day I made them. Are you starting to get the picture? Yummy, I tell you!

Here is Gabe's recipe and a photo of the yummier than yummo muffins. Hint: the fresh lemon zest and juice are the secret! By the way, I know it is poor writing to use the word "yummy" or some form of it 4 or 5 times in one post but I'm telling you, I just couldn't help myself.

Lemon Poppy Seed Muffins (makes 12 standard size muffins):


For the muffins:

2/3 cup sugar
Grated zest 2 lemons

Juice of 1 lemon
2 cups all-purpose flour

2 teaspoons baking powder
1/4 teaspoon baking soda
1/4 teaspoon salt

3/4 cup sour cream
2 large eggs
1 1/2 teaspoon pure vanilla extract
1 stick (8 tablespoons) unsalted
butter, melted and cooled
2 tablespoons poppy seeds


Directions:

Center a rack in the oven and preheat the oven to 400 degrees F. Line 12 molds in a regular-size muffin pan with paper muffin cups. Place the muffin pan on a baking sheet.

In a large bowl, rub the sugar and
lemon zest together with your fingertips until the sugar is moist and the fragrance of lemon strong.

Whisk in the flour, baking powder, baking soda and salt. In a large glass measuring cup or another bowl, whisk the sour
cream, eggs, vanilla, lemon juice and melted butter together until well blended. Pour the liquid ingredients over the dry ingredients and, with a rubber spatula, gently but quickly stir to blend. Don’t worry about being thorough; a few lumps are better than over-mixing the batter. Stir in the poppy seeds.


Divide the batter evenly among the muffin cups.

Bake for 18 to 20 minutes, or until the tops are golden and a thin knife inserted into the center of the muffins comes out clean. Transfer the pan to a rack and cool for 5 minutes before carefully removing each muffin from its mold. Cool the muffins completely on the rack before icing them.

--------------------------

For the Icing:

1 cup confectioners' sugar, sifted
2-3 tablespoons fresh lemon juice


To make the icing:

Put the confectioners' sugar in a small bowl and add about 1 1/2 tablespoons of the lemon juice. Stir with a spoon to moisten the sugar, then add enough lemon juice, a dribble at a time, to get an icing that is thin enough to drizzle from the tip of the spoon. Then drizzle lines of icing over the tops of the muffins or coat the tops entirely.

Friday, March 25, 2011

Hope for Japan Artwork


My Hope for Japan stamp set was ordered as soon as it was announced yesterday. I can't wait to get it in my hot little hands, start playing, and at the same time doing a little bit to help in Japan!

In the meantime, here's some beautiful artwork made with this set by the Close To My Heart Art Department. These guys pump out gorgeous artwork like it's nothin'!

To find out how you can get this set for $5 and have 100% of the profits go to the American Red Cross relief efforts in Japan, click here.

You can also go to my website, click on "Shop Online" and then on "Hope for Japan".

Have a wonderful day!

Thursday, March 24, 2011

Hope for Japan Stamp Set by Close To My Heart


I'm sure you have felt as horrified, saddened, and helpless as I have watching the terrible devastation in Japan. Not only was the original earthquake unthinkable, but the after effects of nuclear disaster, radiation, homelessness, missing people, and so much more continues to hurt my heart as I see images daily on the news.

Close To My Heart's owner and founder, Jeanette Lynton is one of the most generous and caring people I know, and this is evidenced by her latest idea: a stamp set in which 100% of the profits go straight to the American Red Cross to benefit relief efforts in Japan.

Starting today, March 24 through April 30 this set is available to you for $5! Typically this size set sells for $7.95 but Jeanette has made it even more affordable. It's important to me that you know that I will receive no commission at all on this stamp set. Like I said, 100% of the profit goes straight to Japan. I am not promoting this for any form of personal benefit. I'm just so pleased that I can, in my own small way, help the relief efforts in Japan, and so can you by purchasing this set.

To order this set, go to my website: http://leavealegacy.myctmh.com, click on "Shop Online" and you can enter item #A1118, or click on the "Hope for Japan" link. If you have other items to order, you will be also be prompted to enter this set at checkout. There is no limit to how many you can order so go to town! This is a GREAT gift for any scrappin' or stampin' friends you might have, and while giving them this beautiful gift, you are helping Japan! Everyone wins! I am so proud to promote Close To My Heart's act of charity.

In Jeanette's own words: "If we all do a little, together we can do a lot. Let's show our support and together, provide real HOPE for Japan!"

Wednesday, March 23, 2011

Happy Birthday, Jeff!


My nephew, Jeff's 18th birthday is coming up. He is a senior in high school and has had his senior pictures taken twice. Both times he and his mom (my sister, Andrea) were unhappy with the results. As a last ditch effort, Andrea called me and asked if I would be willing to take a stab at it. Of course I said, "Yes!" I'm certainly no photographer, but I do love taking pictures, and every chance I get to take pictures just helps me learn more. I decided to give the photos we took to Jeff for his birthday. His birthday is not for another week, but I couldn't wait to give them to him. Both Jeffrey and his mom were thrilled with the results, and I was so happy that I could do it for them. Here are a couple of the photos (you can click on any photo in this post to see it larger and in more detail).

I made all the photos into a high resolution CD so they could print whatever they wanted, then packaged the CD in this 6" x 6" card. Happy Birthday, Jeff! I can't believe in just a few short months you'll be headed off to college!

Close To My Heart products used on the card: Cocoa Cardstock, Colonial White Cardstock, Indian Corn Blue Cardstock, Sweet Leaf Cardstock, Cocoa Stamp Pad, Indian Corn Blue Stamp Pad, "J" Monogram Dimensional Elements, Stars Dimensional Elements, Metal Brad Assortment, Clear Buttons, Round Sponge, Wonderful Friend Stamp Set (retired, but a stamp set that I love that has the same sort of feel is the one in the Lucky Workshop on the Go), Simple Stitches Stamp Set (retired, but another set I love with great border stitching stamps is Stitched Together).

Click here to shop for these and other wonderful CTMH products on my website, 24/7.

Monday, March 21, 2011

An Easter Card from Margi


My friend, Margi G. is UBER-talented. She sent me this darling card and I just had to share. She used the March Stamp of the Month which as you already know, I LOVE! There is nothing more fun than opening your mailbox to happy mail, especially happy mail as gorgeous as this!

You can find out how to get this beautiful stamp set (during March only) at a discount, or even FREE by clicking here.

Margi always does such beautiful work because she is a detail girl. I love all of the perfect little details she added to this card: the stamped stitching around the edges, the hand-stitched circle, the three accents with buttons ...and not only did she add buttons, she dressed each one up in it's own unique way, with thread, a pearl opaque in the center, or hemp and a crocheted flower (check this one out for sure. They are on sale for 33% off!) Beautiful, I say. Just beautiful!

Thank you, my friend, Margi G.! I love this sweet card. And, I love you too!

To order any of these beautiful products, or any of Close To My Heart's other quality products, click here.

Saturday, March 19, 2011

March Stamp of the Month 3.5" x 8" Card


This is one of my favorite card sizes (3.5" x 8"). It's a little different, but oh-so-much-fun...and it fits in a regular legal sized envelope to send. Woo hoo!

I made this card with the beautiful Beatrix Potter-esque March Stamp of the Month and a few of my other favorite Close To My Heart products. Here is a little image of the carrier sheet (which is 6" x 6" in actuality) for the March Stamp of the Month. Don't you just love it? To find out how to get this gorgeous set at a discount, or even FREE, click here.

CTMH products used: March Stamp of the Month-Sensational Season, Sophia Level 2 Paper Pack, Cocoa Cardstock, Cocoa Stamp Pad, Watercolor Pencils, Pretty Pins (retired), Sweet Leaf Stitched Ribbon, Pink Button Collection, Mocha Opaques, Corner Rounder (remove the guard to make scalloped border...cool trick!), Round Sponge, 3D Foam Tape.

Click here to order the Stamp of the Month, the supplies I used to make this card, and/or other QUALITY stampin' and scrappin' products from Close To My Heart. While you're there, be sure to click on the "While Supplies Last" link in the "Shop Online" section. There are scrapbookin' accessories as low as .29 in there. For real!

Friday, March 18, 2011

Scrapbook Supplies Sale!


New items have been added to the "While Supplies Last" section in the "Shop Online" portion of my website...some as low as .29! No kidding! Check it out! In case the "While Supplies Last" link didn't clue you in, they are only available while supplies last. Baaaa Haaaa Haaaa! I crack myself up!

Oh, and while you're shopping, don't forget that during March only, when you spend $25 or more (before shipping and tax) on stamp sets, you get to choose either a 3" x 3" or a 2" x 6 1/2" acrylic block FREE! After you enter the items you want to order and press the checkout button, you'll be prompted to choose which block you want. Easy, peasy, lemon squeezy!

Need a GREAT suggestion for a stamp set you'll LOVE to spend that $25 on? I suggest Bohemian Alphabet (E1019). It's a GORGEOUS alphabet, complete with numbers, a couple of flowers and leaves that coordinate beautifully, and even a couple of bracket and punctuation stamps. In fact, this set has 52 stamps in it!

Head to my website to take advantage of these awesome deals 24/7!

Tuesday, March 15, 2011

Little Video about Being a Close To My Heart Consultant

Take a few quick minutes (just a little over 3 and a half minutes) and watch me tell you a little bit about what I do and why I love it so much.


I would LOVE to help you get started as an Independent Consultant with Close To My Heart. It's only $129 to get started and you can easily make that and MORE back in your first month. I've been a Consultant with CTMH for over 18 years, so there is OBVIOUSLY something here worth being a part of for a long, long time! I love it!

To sign up, head to my website, click on "Your Opportunities", the scroll to the bottom of the page and click on the link that says "To Sign Up To Become a Consultant, Click Here."

My suggestions on your 3 Kit "Choose Me" Options: Choose Me Kits #2, #3 or #4, and #5. I also strongly suggest you sign up for your own website. It's only $5.95 per month for your first year! With Studio J (CTMH's perfect answer to digital scrapbooking) taking the industry by storm, you'll want your own website so your customers can take advantage of this through YOU!

Monday, March 14, 2011

"Lyla" Banner by Kori


My daughter, Kori has been busy, busy, busy papercrafting the past few weeks, as evidenced by several of her layouts and projects I have been sharing on my blog lately. Today, I share another! Kori's friend's little girl (Lyla) just turned 1 and Kori made a banner and little scrapbook for her gift. Today I thought I'd share the banner. Lyla's room is done in pinks and black so Kori used those colors on the banner. That way they could hang it in her room after the birthday. Smart! How cute is it anyway?

By the way, you can click on any photo in this post and see it larger and in more detail.

I'm a proud mommy! In addition to papercrafting, Kori is great at making beautiful flowers and headbands for little girls' hair, grown up girls' hair, and even to pin on necklaces and lapels. You can check out her website here. Here's a cute little pic of my daughter and granddaughter. Daci is actually wearing one of Kori's gorgeous headband/flower creations.

Back to the banner: my favorite part is the black and white damask! Kori embossed the damask stamp in black on white cardstock for every banner piece. GORGEOUS! Here are some up-close pictures of each banner piece. The 1" pink satin ribbon is the only thing that is not a Close To My Heart product. I think Kori picked it up at Hobby Lobby.


Close To My Heart products used: My Creations Banner, Bohemian Alphabet Stamp Set, February Stamp of the Month, White Cardstock, Cotton Candy Cardstock, Baby Pink Cardstock, Black Cardstock, Clear Sparkles, 2" Scallop Circle Punch, Black Stamp Pad, Cotton Candy Stamp Pad, Versamark Pad, Black Embossing Powder, Embossing Gun, Finishing Files.

Order these and other great Close To My Heart products on my website, 24/7...especially on a 'banner day'!

Friday, March 11, 2011

More Studio J: a Layout and a Tutorial


Today I thought I'd share another pretty Studio J layout that my daughter, Kori made of Easton's wedding luncheon (you can click on the layout to see it larger and in more detail). And, I thought I'd share another GREAT Studio J tutorial from Amy Ulen on some GREAT matting techniques.

I learned so much from this tutorial. I think you'll love it too.


Tuesday, March 8, 2011

Studio J Layout and Tutorial


Thanks to two people who made this post possible: Kori (my daughter) who shared some of her newest Studio J layouts with me and allowed me to share with you, and Amy Ulen who is a Studio J genius!

The layout of Kori's that I have chosen to share today is called "Ornament Time" (you can click on the layout to see it much larger and in more detail). I love this layout for many reasons:
  • It shows a fun family tradition that started with my mom and dad and that Dan and I have decided to carry on with our grandkiddos
  • Daci's hat and monkey shirt are too cute for words
  • The papers and embellishments that Kori was able to use digitally on this layout are the perfect compliment to the photos.
  • I love that with Studio J, you get FREE .jpgs of all of your purchased layouts that you can share via email, Facebook, blogs, etc. with family members. So much fun!
Amy has made several YouTube Studio J tutorial videos and they are so worth the watch! In fact, if you check back over the next few weeks, I will be sharing many Studio J layouts and several of Amy's tutorials. You will LOVE them. Thanks to Amy for allowing me to post these, and even more thanks for taking the time to make them.

If you are not already a Studio J (Close To My Heart's perfect answer to digital scrapbooking) member, you ought to be! It's easy to join. Just go to my website: http://leavealegacy.myctmh.com, click on "Studio J" and sign up. Before joining, you can create as many layouts as you want and play for free. There is only a charge when you want to be come a member (3 month or 12 month membership available) and when you order layouts. There is no fee for each individual paper pack, embellishment, etc. In fact, there is never any need to buy anything but your layout. CTMH stores all the things you need right on the Studio J site and you can use any embellishment, paper, pattern, etc. without having to pay for them! COOL BEANS!

Beginning Studio J Tutorials (or even if you are a seasoned Studio J user, you can learn something from these. You'll also LOVE the more advanced tutorials that I will be sharing over the next couple of weeks!):

How to create a layout, part #1


How to create a layout, part #2


Monday, March 7, 2011

Another Stamp of the Month Card (5" x 5")


This is a simple little card. I decided not to add any embellishments other than this yummy Sweet Leaf Stitched Ribbon (which, by the way, is a great bargain!). I ran my Heavenly Blue Cardstock through my Cuttlebug machine with one of the damask plates and then lightly sponged the edges of it with cocoa ink. I wanted this card to be simple so little Peter Rabbit from Close To My Heart's March Stamp of the Month (Sensational Season) was the focal point. I just love him and his mischieviousness! Find out how to get your own stamp set FREE by clicking HERE.

You can also get a few watercolor pencil coloring tips in the post just below this one.

CTMH products used: March Stamp of the Month, Colonial White Cardstock, Heavenly Blue Cardstock, Sweet Leaf Cardstock, Sweet Leaf Stitched Ribbon, Cocoa Stamp Pad, Watercolor Pencils, 3D Foam Tape, Round Sponge.

Head to my website to shop for these and other quality CTMH products 24/7.

Saturday, March 5, 2011

March Stamp of the Month 5" x 7" Card (Sensational Season)


I fell in love with the March Stamp of the Month at Close To My Heart the minute I saw it. It's Beatrix Potter flavor along with the images that are just perfect for my favorite coloring technique (watercolor pencils) just float my boat!

You can see several cards I made with this set and also find out how to get the set FREE by going here.

I colored the images in this card with my watercolor pencils but didn't use any water. I love watercolor pencils just for coloring. Because they are made to blend with water, they are soft and oh-so-easy to blend and shade with. I also love the effect using a blending pen or waterbrush, but I decided just to color with them plain for these cards.

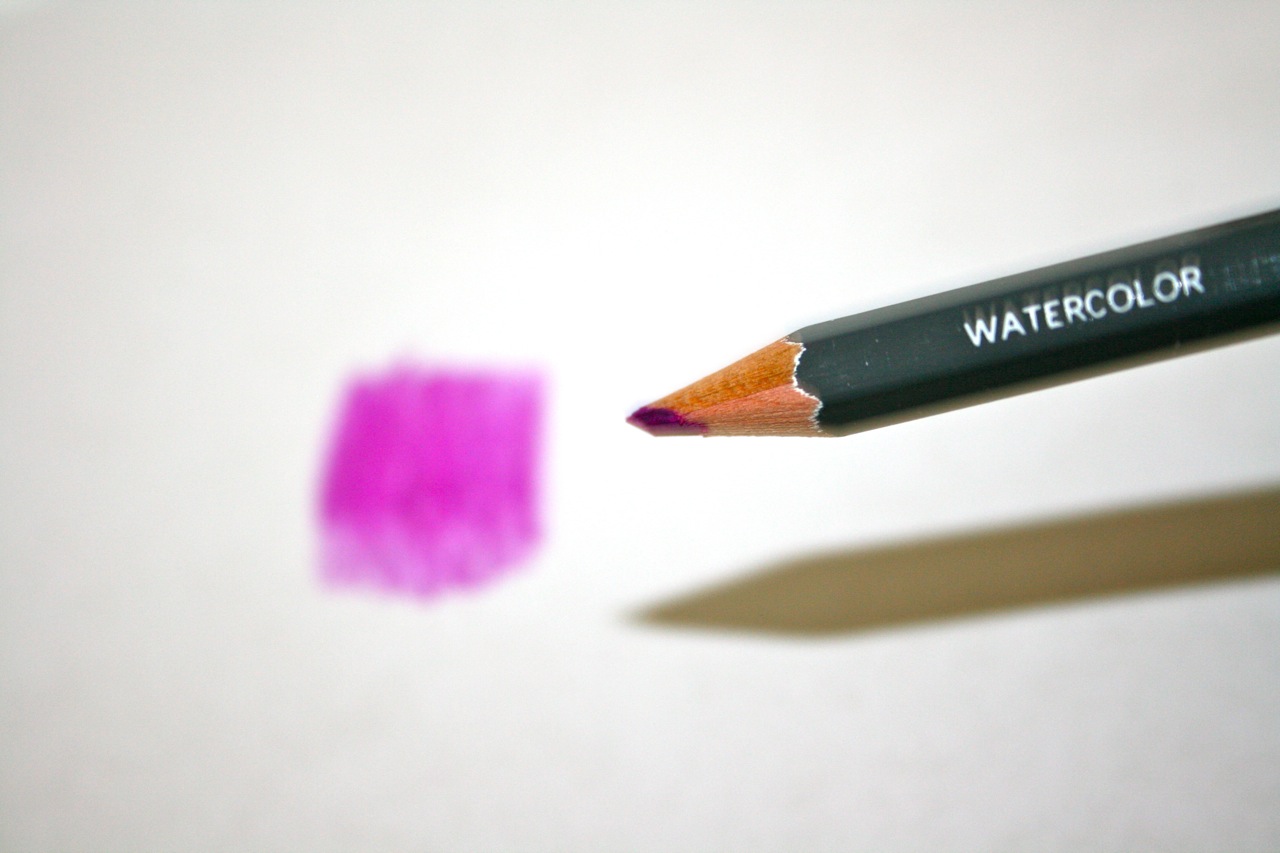
Watercolor Pencil Coloring tip: Don't use a sharp point to color with. Color a little bit on scratch piece of paper until you get a nice flat angle on your pencil. Color with this flat edge and you will be able to blend and color seamlessly! I hope you can see what you mean in this photo. Can you see how I've made a flat edge on my pencil by scribbling on a piece of scratch paper? That flat edge is the edge you want against your paper as you color. When shading, just start in the place you want darkest and press harder and press lighter as you move in. Also, color in the shape of the edge. The edge of the basket is curved, so I started along the edge I wanted darkest and went in a curve up and down the inside edge and continued inward as I lightened my pressure. Clear as mud? I hope clear as a bell!

The middle basket, I think you can see, is popped with 3D Foam Tape. I still stamped the image below it so that it shows underneath. I love that look! The little flowers come in our new pink button collection (72 buttons included!) and the centers are our mocha opaques (108 gems per pack!); two products that I am currently infatuated with.

CTMH products used: March Stamp of the Month (Sensational Season), Sophia Level 2 Paper Pack, Kraft Color Ready Borders, Cocoa Stamp Pad, Round Sponge, Watercolor Pencils, Pink Button Collection, Mocha Opaques, 3D Foam Tape.

You can order these and other wonderful products on my website, 24/7...especially on a lazy Saturday when you have no make-up on and are in sweats and stripey slipper socks (I wonder who might look like that today....hmmmmm).

Friday, March 4, 2011

April Play Group Layouts (Sophia)


Layout #1 - "Pals":-------------------------

Layout #2 - "Sweet" (inspired greatly by the FABULOUS Lisa Stenz):
----------------

Layout #3 - "All Girl"

As you know by much of the artwork I have been posting over the past month or two, I have fallen in love with the "Sophia" kit in Close To My Heart's Spring/Summer 2011 Idea Book. Because of that, I have chosen it as the kit we will be using in my Play Group classes in April. I think you'll love them!

We will be making all three of the two-page 12" x 12" layouts you see here (feel free to click on any photo to see it larger and in more detail). Aren't they darling? I have always been a BIG fan of pink and green together...well ever since my obsessions with 'all things preppy' in junior high. I got over the preppy, but the pink and green found its way into my heart forever.

If you are not sure what Play Group is, just scroll down on the left side of my blog until you see the heading "Play Group Information" and all the details are there about how my classes work.

April Play Group Dates and Times
  • Tuesday, April 19, 10 am - 1 pm
  • Tuesday, April 19, 7-10 pm
  • Wednesday, April 20, 10 am - 1 pm
  • Wednesday, April 21, 7-10 pm

Remember, in order to attend, you only need to purchase the Basic Kit. Anything above and beyond that is totally optional. This month, in addition to the Basic Kit, I suggest you at least add the first 2 items in the Better Kit. Those 2 little items make a huge difference! If you do that, your subtotal would be $45.85 and your total with shipping and tax would be $52.59.

Basic Kit
Subtotal: $30.95*
Total with shipping and tax: $33.50

Better Kit = Basic Kit + the following products
Subtotal: 62.85**
Total with shipping and tax: $72.10

Best Kit = Basic and Better Kits + the following products
Subtotal: $97.80***
Total with shipping and tax: $112.19


*at this purchase level, you qualify for the Stamp of the Month**** ($22.95 value) at 25% off ($17.21)
**at this purchase level, you qualify for the Stamp of the Month**** ($22.95 value) at 50% off ($11.48)
***at this purchase level, you qualify for the Stamp of the Month****($22.95 value) at 75% off ($5.74)


****I have linked you to the March Stamp of the Month above. If you happen to purchase your kit in April, you will get the April Stamp of the Month instead.

Call or email me to sign up for a class and to place your kit order no later than Monday, April 11 at 9 am (801.360.9896, pedermom@aol.com) OR, order some of these items yourself on my website 24/7.

LinkWithin

Related Posts with Thumbnails