

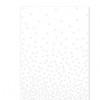
The November Stamp of the Month is great for documenting goals for 2016, as well as wishing someone you love a Happy New Year. I created this standard size (4 1/4" x 5 1/2") card with our wonderful watercolor paints and paper. I just love watercoloring! And, using your watercolors as a wash behind an embossed image is a GREAT way to begin, if you've never really watercolored before. I will give step-by-step instructions below on how I achieved this look, but first let me remind you about how to get this darling stamp set for only $5.
 |
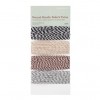
| November Stamp of the Month - Cheers, 2016! (carrier sheet size is approximately 6" x 6") |
This set (Cheers, 2016!) is only available during November, and is yours for only $5 ($12.95 savings) with every $50 you order (before shipping and tax). Order $100, get 2...and so on. When ordering on my website, you'll be prompted to add your set(s) before you check out. Easy, peasy!
Now, back to the instructions for the Color Wash Watercolor technique:

- Be sure to use our watercolor paper. This makes a huge difference in how smoothly the color goes on!
- Emboss what you want on the paper first. I used a black pigment pad and clear embossing powder for my black images.
- Use the largest of our watercolor brushes and some water and "paint" the whole piece of the paper you will be washing lightly with water.
- Next choose what color of paint you want to work with. As you can see, I used three different colors: a purple, blue and coral. I started with the purple. Wet your brush and pick up your purple paint. Start at the bottom of the paper and work your way up by going back and forth with the color. As you move upward, your color will lighten. Be sure the area you start in is where you want the most color. This way you will get more of an ombre feel. You can always go back and add a bit more color if you want a more dramatic look.
- I then did the same with my coral color at the top of the paper.
- Lastly, I filled in the middle with a hint of blue.


1 comment:
Love, love, love this card!!
Post a Comment