pin it button

Friday, March 29, 2013

Rose Layout and Card with the March Stamp of the Month

March is almost a memory, which means so is the March Stamp of the Month (Floral Happiness).  As we wind the month to a close, I thought I'd share 2 more pieces of artwork I made with this most elegant of sets.

First, the layout at the top of the post. I loved the idea of the roses with this stinkin' cute photo of our granddaugther, Daci (who is also stinkin' cute, hence the stinkin' cute photo) at her 4th birthday party. It was a princess party and she was Snow White. 

Here is a close up.  I enjoyed using the Pearl Opaques scattered around the layout to dress it up, as well as the fun Canvas Alphabet for my title. This really is a very simple layout using nothing but paper, ink, the Stamp of the Month, opaques and canvas letters


To find out how I made the rose paper that you see on both of these projects, check out this post.

Secondly, here is a 5" x 5" card also made with the set.


and a little detail shot:


The March Stamp of the Month set is only available through March 31 and is yours for only $5 ($17.95 value) with a $50 order.   Hop on over to my website to place an order.  You will be prompted to add the March Stamp of the Month before you check out.

Tuesday, March 26, 2013

Scrappin' the Weekend Away!

I forgot to take a photo of the house, but this one is on the same street and looks very much like it.
This past weekend I spent several days in beautiful Park City, UT at an amazing "cabin" (so big that the bathrooms even had signs on them so you didn't get lost) with 11 other ladies scrappin' and laughing.  It was a BLAST!  I was invited by some of my dear friends/customers and just loved every second. I met lots of new friends while enjoying time with old ones (old is in no way meant in a derogatory fashion. *wink*), and getting TONS of designing done for my business.
Beautiful Park City, UT
We arrived on Friday afternoon and got our scrappin' spots all set up and got busy.   The two ladies who organized the weekend (hi, Jamielyn and Nicole) took care of all of the food for the event. We were served a delicious dinner of chicken roll ups,  funeral potatoes, salad, and strawberry shortcake for dessert.  We all scrapped late into the night. I wish I had pictures of everyone who attended, but we were so busy scrapping we forgot to take pictures.  Thanks to Christina who took a few and shared them with me.
MaryAnn, Christina and I

Linda

Christy and Heidi

Jamielyn, Angelique and Nicole (Jamielyn and Nicole organized the weekend and did all of the cooking. Yum!)
There were tons of bedrooms in this home and they each had their own bathroom. My buddy, MaryAnn and I stayed together in a charming room with our own bathroom (with a cute shower curtain that I want for my own home. Don't worry. I didn't take it).

Saturday morning we got up to cinnamon pull aparts and fresh fruit for breakfast.  Delish!  For lunch we were treated to large deli trays, a veggie tray, a fruit salad and chips.  Dinner was a yummy pasta carbonera and salad. We scrapped ALMOST all day Saturday, except for the hour we took off to make a Scrapbookin' Mamas Harlem Shake video. Yes, we really did!  For those of you who don't know what the Harlem Shake is, I'll explain. It's a silly trend right now.  It starts with one person being a little outrageous dancing to the Harlem Shake song and everyone else looking like they are doing something normal, then it cuts to everyone being crazy to the Harlem Shake song.  Everyone from the Miami Heat to the University of Georgia Swim Team have made a video. We thought, "Why not scrapbookin' moms?" Everyone at the crop was teasing me about being Mrs. Utah 1995 (Thank you so much, Christina for announcing that. And, yes, that was said with MUCH sarcasm!) so I am in the video in a crown, cape and sash. We thought it would be funny in addition to our costumes for all of us to have something scrapbook-y. Mine was a 'scepter' of a ruler topped with a piece of glittery scrapbook paper.  I'm kind of hard to see (thank goodness) but if you look hard you can see me in the back left corner. To see other Harlem Shake videos, you cans search them on YouTube. I suggest the swimmers underwater one and the Miami Heat one. Very funny.  Of course, they pale in comparison to ours. *wink*


Sunday morning, we slept in a bit, had a yummy breakfast of German pancakes, sausage and fresh fruit, scrapped until noon, then cleaned up and were on our way home.

I took up a little gifty for each of the ladies attending. I shamelessy scraplifted the idea from my friend, Sheri Rottler, who gave me one almost like it a while ago. Thanks, Sheri!

Gifty Bag

Gifty bag with contents: Easter chocolate, 5 rolls of CTMH ribbon and a tag

I was able to finish 18 pages...all designed for May, June and July's Play Group Scrappin' classes. I also got the cutting guides and shopping lists done for all of them. Life is good!  It feels so good to laugh with friends, make new ones, and accomplish a lot all at the same time. Thanks for a wonderful weekend, my scrapbookin' friends!

Thursday, March 21, 2013

April Play Group Scrappin' Class Layouts (Buzz & Bumble)

Here are the three 2-page 12" x 12" layouts we will be making in my Play Group classes in April (click on any photo to see it larger and in more detail). If you would like to participate, please contact me (801.360.9896, pedermom@aol.com) with your kit order no later than FRIDAY, MARCH 29

You can participate in my Play Group classes in one of three ways:


  1.  Attend a class in person
  2.  Host one in your home with your friends (and earn free product!). Call or email me to schedule your date (801.360.9896, pedermom@aol.com)
  3.  Participate long distance. Just add $5 to the kit total you see to have your kit shipped directly  from me to you. (call or email me to order your kit: 801.360.9896, pedermom@aol.com)
In person class dates and times:
  • Thursday evening, April 4,  7-10 pm in Pleasant Grove, UT
  • Friday morning, April 5, 10 am - 1 pm in American Fork, UT
I'm confident you will enjoy what we do and be very happy with the projects you make! I know exactly which photos are going on these layouts, I have just not printed them off yet. I didn't dare wait another day to get this posted, so you get to see blank layouts this month. I'll try to post again when I get the photos on.

After the layout photos, you'll find the shopping list.  Keep reading...


Layout #1: "4 YRS".... this layout will be filled with my granddaughter, Daci's 4th birthday.

Layout #1, without photos

Layout #1: Detail photo 2

Layout #1: detail photo 2
 --------------
Layout #2: "Happy":
Layout #2, without photos

Layout #2, detail photo 1

Layout #2: detail photo 2
 -----------------------

Layout #3: "FRIENDS"
Layout #3: No photos
Layout #3: detail photo 1


Layout #3: detail photo 2

Layout #3: detail photo 3

Shopping List:  To attend or participate in a class, all you are required to purchase is the Basic Kit.  If you want to purchase the Better or Best Kits, or even pick and choose a few items from those to add to your Basic Kit, you are welcome to, but it is not required.

Basic Kit (this is all that you are required to purchase to participate)

Subtotal: $31.75
Total with Shipping and Tax: $36.41 (add $5 more if you are participating long distance)


Better Kit = Basic Kit + the following products (I recommend this kit!)
Subtotal: $51.55*
Total with Shipping and Tax: $59.13 (add $5 more if you are participating long-distance)

Best Kit = Basic Kit + Better Kit + the following products  
Subtotal: $68.55*
Total with Shipping and Tax: $78.61* (add $5 more if you are participating long distance)

*at this purchase level ($50 or more)  you qualify for the March Stamp of the Month  ("Floral Happiness" - $17.95 value) at only $5!


Foral Happiness: March Stamp of the Month
See yesterday's post for a great tutorial on making patterned paper with this set!

Wednesday, March 20, 2013

"Happiness is...Family" Card

Are you getting tired of Chantilly projects?  Me neither, but I thought I'd mix it up a bit and share a project I made with the March Stamp of the Month, which is also a keeper!  In fact, come to think of it, with the right colors it would look beautiful with Chantilly papers.

I chose to go a different route with this stamp set. I envisioned rich red roses and went  to town to create some patterned paper of my own.  Creating your own Background & Texture Paper (patterned paper) is so much fun! In fact, I'm giving you a step-by-step tutorial on how I created mine in 2 seconds...


Before I get too far into this post, just a reminder that this beautiful stamp set is only $5 this month with a $50 order (before shipping and tax). You can easily order it on my website. You may even want to spend your $50 on some of the items I talk about below. I have included links to all of them.  You will be prompted to add the Stamp of the Month as you check out.

Here's a little step-by-step tutorial on how I created my own B&T paper:
1.  I began by stamping the chevron design stamp from the new In the Background stamp set in Champagne ink on a sheet of Colonial White Cardstock. This is a big stamp and so easy to line up.  This set also includes 2 other background stamps. 
In the Background:  Actual size of carrier sheet is 6" x 6"

2. Once I filled a 12" x 12" sheet with the chevrons, I moved on to the stamps I wanted to use from the March Stamp of the Month (Floral Happiness). I started with the big, solid rose and stamped it randomly with Ruby ink.

March Stamp of the Month - Floral Happiness (actual size of carrier sheet is 6" x 6")

3.  Next I went back with the detail stamp for the large rose and stamped it on top of the roses in Cocoa ink.

4.  I filled in some of the blank spaces with a solid leaf stamped in New England Ivy ink.

5. I then topped of the leaves with the lined vein stamp done in Ponderosa Pine ink.

6. Lastly, I filled one of my Spray Pens up to the first measure line with Saddle Reinker.  I then filled up to the 5th line with water and shook it up.  Then I misted my whole sheet of patterned paper lightly with this spray.

Voila! Now I had a whole sheet of beautiful rose patterned paper. Actually, I had 4. I made four sheets and got about 25 cards and a layout out of them.  Here is a photo of my paper:


If you want to know the rest of the details of how to make this card (or even if you don't...lol!), here they are:
1. The card is a 4 1/4" x 5 1/2" card. I used one of our value pack Colonial White Cards and Envelopes. Love these!
1. The size of the piece of patterned paper at the top is 4" x 2 1/2"
2.  The Ponderosa Pine Cardstock piece at the bottom is 4" x 1 3/4"
3. The middle piece that says "Happiness is...FAMILY" is 4" x 1 strip of Colonial White Cardstock. I stamped it first with the chevron in stamp in Champagne ink and then the sentiments in Cocoa ink. The word "Family" came from another set, Family Love.
4.  I then glued that strip to a 4" x 1 1/2" piece of Ruby Cardstock and used my scallop scissors to trim both sides.  This then was adhered to a 4" x 1 1/2" piece of Colonial White Cardstock and then glued to the middle of the card.
5. To finish it off, I added 3 of the large Pearl Opaques to the bottom right corner.

Have a happy day!

Sunday, March 17, 2013

Chantilly "You Make Me Smile" Card

As you can tell, I have had fun creating with the Chantilly papers.  I am a huge lover of pink and green, then on top of that Close To My Heart added paisley to the mix. Be still my heart!  I've been gettin' my Chantilly on!  In fact, maybe I need to dedicate this card to Chantilly.  Chantilly, "you make me smile!"

I had lots of fun with embossing on this card. I not only embossed the sentiment, but also embossed on two of my wooden flowers after I used my Round Sponge to sponge them with color from the Cotton Candy Stamp Pad.   You can see a bit more detail by looking at this photo...


I really love the White Daisy Die-Cut Cards and Envelope sets.  I used one of the cards for the base of this one.  In fact, I have to say that every single piece of paper and accessory item that I used on this card "made me smile." I am so happy that Close To My Heart carries so many fun papers, colors, accessories and bling!  The whole product list is below.

Close To My Heart products used:  Hooray Bouquet Stamp Set, Love Doily Stamp Set (I actually used a retired set for the doily look on the large wooden flower, but this set would have worked great as well), White Daisy Die Cut Cards and Envelopes, Chantilly Papers, Versamark Pad, White Daisy Embossing Powder, Cotton Candy Pad, Round Sponge, Garden Wooden Shapes, Pink Button Assortment, Basic Button Assortment, Chantilly Assortment.

I love the sentiment on this card. "You Make Me Smile" can be used for so many occassions. And, it comes in a set of wonderful flowers and a few other sentiments. I think this "Hooray Bouquet" stamp set is a must have. Not only is it darling, but those flowers coordinate with our CTMH/Cricut Art Philosophy Cartridge. Neato Cheeto!

Hooray Bouquet Stamp Set


Do you know what else "makes me smile?"  These two.....

Tannon and Michelle spent the day yesterday at a wedding expo getting ideas for their wedding and entering every prize drawing there. They are just certain they are going to win every drawing and get their photography, cake, flowers, and honeymoon for free.  Ha! 

You can shop for these (except for Tannon and Michelle....they are mine and not for sale, at least not today), and so many other scrumptious products on my website 24/7.

Monday, March 11, 2013

Friends Layout Using the Chantilly Papers


Here I am...back with more Chantilly artwork I hope you enjoyed the little break from my Chantilly series with my niece's wedding sign in book on Friday's post. I had so much fun making it for her. You can go back to this post and this post to see more Chantilly artwork if you missed it last week.

This layout was inspired by the one page layout you see on page 19 of the Spring/Summer Idea Book. I fell in love with this layout when I saw it and wanted to re-create it in a 2-page spread.  The reason that this layout has no photos on it is that I created it as a reward for those in my downline who reached a challenge a few months ago. I try to run fun challenges for my team every few months that help them have a little something extra to work toward.  Join my team and start working toward some of those rewards yourself!

Here are a few detail shots of the layout:


Want to make the layout yourself?  Well, just order the products from the 'products used' list below on my website and then use the cutting guide I created for you below. Easy, peasy!

CTMH products used:  Pear Stamp Pad, Chantilly Paper Pack, White Daisy Cardstock, Chantilly Assortment, Chantilly Textiles (cut two 2" x 24" strips and gather for the ruffles), Hollyhock Zipper Lace (temporarily unavailable because so many people have loved it that we ran out. Don't worry! It will be available again soon!), Pink Glitter Gems, Pink Button Assortment, Notable Alphabet Dimensional Elements, Colonial White Waxy Flax, Round Sponge (used with Pear Stamp Pad to color the Dimensional Elements letters). All of these products can be purchased on my website, 24/7!

Cutting Guide.  Please ignore the fact that it says "Team Meeting 1/26/2013" on it (I also used this for a team meeting with my downline). To see this cutting guide larger, just click on it then you can save it to your desktop and print it to use on your layout.

Have a Chantilly kind of day!


P.S. This is one of the three 2-page layouts we will be making in my Play Group Scrappin' classes in August!


Friday, March 8, 2013

Wedding Sign In Book Using For Always Paper


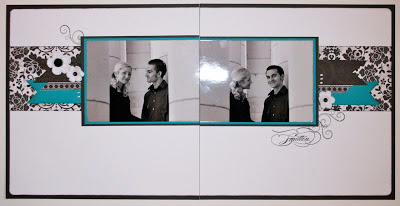
My sweet niece, Katie married her sweetheart, Robert last month. Their colors were black, white and turquoise.  She asked me if I would be willing to make their sign-in book.  I was excited to try to create something beautiful that could be filled with comments and well-wishes from the guests to the bride and groom.  Here are photos of  the book before it was filled with signatures. By the end, there was not a centimeter of space that wasn't written on.  Congratulations,  Robert and Katie!  I wish you an eternity of happiness together!

By the way, I know I said I would be showing lots of projects this week made with the Chantilly papers, and I still will, but I realized I hadn't shared this book and really wanted to share before I forgot again. :)

A few notes:  


Title Page (this one wasn't to sign on)


Closing Page (this one wasn't to sign on either)
Love you, Miss Katie...or I guess I should say, "MRS. Katie?" *wink*

LinkWithin

Related Posts with Thumbnails